Monstera Care Guide: Grow Thriving, Beautiful Plants
Monstera plants, with their big, dramatic leaves and jungle-like charm, have become a favorite for plant lovers everywhere. But let’s be honest, those stunning looks can be deceiving. Keeping them happy and thriving takes a bit more than just admiring them from across the room.
After keeping these beauties for a decade (and making plenty of mistakes along the way), I’ve learned what makes them tick. This guide is everything I wish I’d known when I got my first Monstera.
Quick answer: To keep your Monstera healthy, place it in bright, indirect light, water once the top 2–3 inches of soil feel dry, and use a chunky, well-draining mix. They love humidity above 60% and will reward you with bigger, fenestrated leaves if you give them some support, like a moss pole or trellis.
1. Understanding Your Monstera: The Basics
1.1 What is a Monstera? Demystifying the Species
Monsteras have skyrocketed in popularity over the past few years, and it’s easy to see why. With their bold leaves and tropical vibe, they’ve become the centerpiece of countless indoor plant collections.
In their native Central American jungles, these beauties grow as epiphytes — meaning they use their aerial roots to climb trees and reach for the light.
So, what’s the deal with these jungle giants? A few things make them totally unique:
- Aerial roots: These help the plant climb and can even take in extra nutrients and moisture from the air.
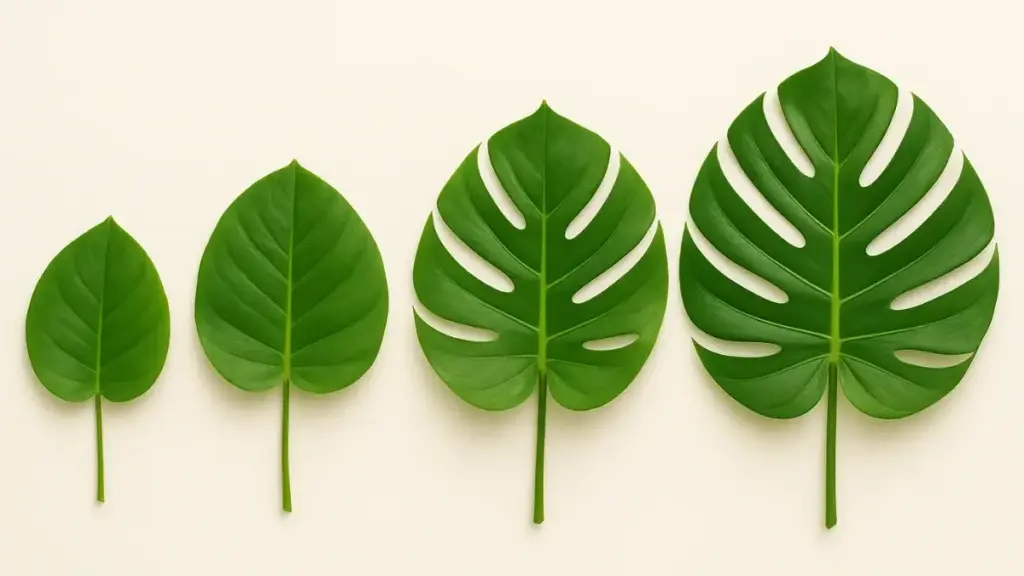
- Fenestrations: The famous holes and splits that give mature Monstera leaves their dramatic look.
- Juvenile leaves: When they’re young, the leaves start off simple and heart-shaped. As the plant matures, those plain leaves transform into the stunning, split foliage Monsteras are known for.
1.2 Popular Monstera Varieties for Indoor Cultivation
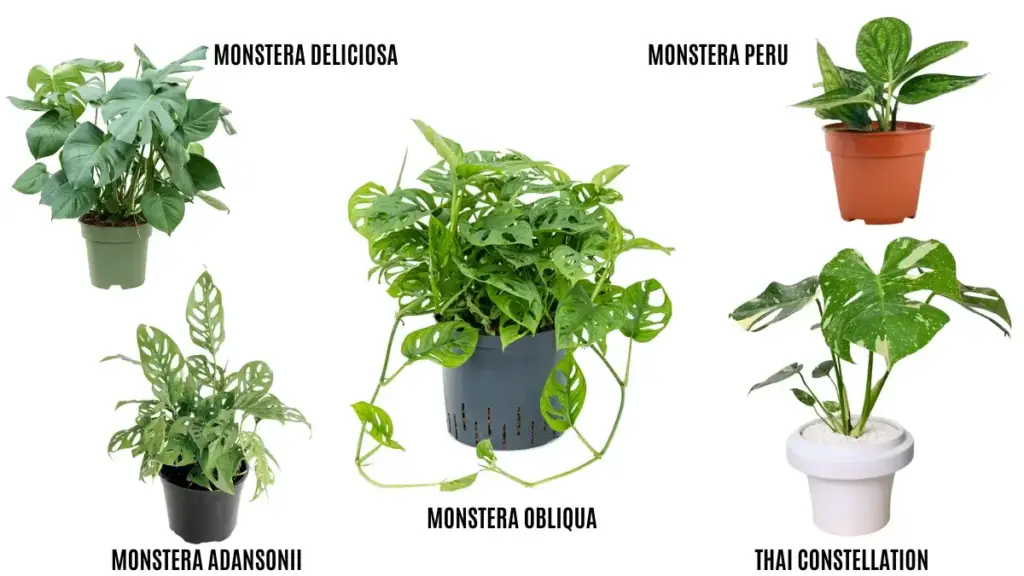
Think a Monstera is just a Monstera? Think again. This plant family has some seriously cool (and collectible) members, each with its own vibe. Here are a few of the most popular (and coveted) types you’ll come across:
- Monstera deliciosa (the classic): This is the one most people picture when they think of a Monstera. Its huge leaves with deep splits give that jungle vibe we all love, and it grows quickly with very little fuss. A great choice if you’re just starting out.
- Monstera adansonii (the “Swiss Cheese Plant”): Instead of splits, this variety develops charming oval-shaped holes right in the leaf. Its smaller size makes it perfect for hanging baskets or training up a trellis.
- Monstera obliqua (the unicorn): This one is so rare that most plant parents will never see it in person. The leaves are paper-thin and more holes than leaf, often mistaken for adansonii — but much harder to find (and to keep alive).
- Monstera peru: A completely different look from the split-leaf types, peru has thick, leathery leaves with a beautiful textured surface. It brings a rich, tactile element to a collection.
- Monstera Thai Constellation: The showstopper. This variegated form of deliciosa is splashed with creamy-white patterns across its leaves. Collectors love it, and it’s one of the most sought-after Monsteras you can grow indoors.
2. Essential Monstera Care: Foundations for Success
2.1 Light: Finding the Sweet Spot for Growth
Let’s talk about the single most important factor for a glorious Monstera: light. Get this right, and you’re 90% of the way there.
Here’s what to aim for:
- Soft, indirect light: Monsteras naturally grow under tree canopies, so they do best in gentle light that mimics dappled shade.
- Window placement: East- or north-facing windows are ideal because they bring in bright morning sun without the harsh afternoon rays.
- Too little light: You’ll notice smaller leaves, long leggy stems, and fewer (or no) fenestrations.
- Too much sun: Yellowing or crispy brown edges—especially on new leaves—are a clear sign your Monstera is getting scorched.
Pro tip: Keep your Monstera out of direct afternoon sun. If you don’t have a bright enough spot, try moving it back a few feet from the window or add a grow light to supplement.
Rotation tip: Give your plant a quarter turn once a week. This prevents it from leaning dramatically toward the light and helps every side grow evenly lush.
2.2 Watering Your Monstera: The Art of Hydration
Watering is where most people, myself included, have tripped up. It’s a balancing act between love and neglect.
How to assess when to water:
- Finger test: Insert your finger 2-3 inches of soil deep; water when the top layer feels dry
- Moisture meter: For precision, use a soil moisture meter to gauge deeper soil conditions
- Weight method: Lift the pot; a noticeably lighter pot indicates it’s time to water
Watering best practices:
- Frequency vs. consistency: Allow soil to dry out before watering again rather than giving small amounts regularly
- Signs of overwatering: Yellowing leaves starting from the bottom, musty soil smell, soft brown roots
- Signs of underwatering: Crispy leaf edges, drooping despite adequate light, soil pulling away from pot edges
Understanding your plant needs means recognizing that Monsteras prefer to dry out between waterings rather than staying constantly moist. Water every 1-2 weeks during the growing season, adjusting based on your home’s humidity levels.
How Do You Know If a Monstera Plant Needs Water? – An in-depth guide covering all aspects of proper watering techniques and timing.
2.3 Soil & Potting: Creating the Perfect Environment
Don’t underestimate the power of a good home. Your Monstera’s roots are its foundation, and they hate being suffocated in soggy soil.
The right soil mix and pot make all the difference between a thriving plant and one struggling with root problems. Monsteras need airy, well-draining soil that mimics the loose, rich forest floor they grow in naturally.
Here’s what to include in a good mix:
- Aeration: Add chunky ingredients like perlite, orchid bark, or pumice (about 30–40% of the mix). These keep the soil light and let roots breathe.
- Drainage: Coarse sand or extra perlite helps water flow through instead of sitting heavy at the bottom.
- Nutrition: A high-quality potting soil should make up the bulk (about 50–60%) to provide nutrients and stability.
Choosing the right pot:
- Terracotta: Great for airflow since the clay “breathes,” but you’ll need to water more often because soil dries faster.
- Plastic: Holds onto moisture longer. Just make sure there are drainage holes, or you’ll risk soggy roots.
- Ceramic with drainage: Stylish and practical—a nice middle ground if you want both looks and function.
Big takeaway: drainage is non-negotiable. Without it, your Monstera is a sitting duck for root rot. Always check that water can freely escape from the bottom of the pot.
Monstera Drainage Hacks: 8 Expert Tips for Better Soil and Root Health – Deep dive into advanced drainage solutions and soil amendments.
Note: All soil recommendations are based on horticultural science and proven successful growing methods for tropical plants.
2.4 Humidity & Temperature: Mimicking the Tropics
Monsteras really come alive when their environment feels like home—that means steady warmth and plenty of humidity. The right conditions not only keep your plant healthy but also encourage those gorgeous split leaves.
Temperature sweet spot: Keep your Monstera in a range of 65–85°F (18–29°C). They don’t appreciate sudden chills or blasts of hot, dry air, so avoid spots near drafty windows, radiators, or heating vents.
Why humidity matters: In the wild, Monsteras grow in steamy, tropical jungles with 60–80% humidity. When the air is too dry, you’ll often see:
- Brown, crispy leaf edges
- Slower overall growth
- Fewer (or no) fenestrations
- A higher risk of pests like spider mites
Easy ways to boost humidity:
- Humidifiers: The most reliable way, especially if you’re caring for multiple tropical plants.
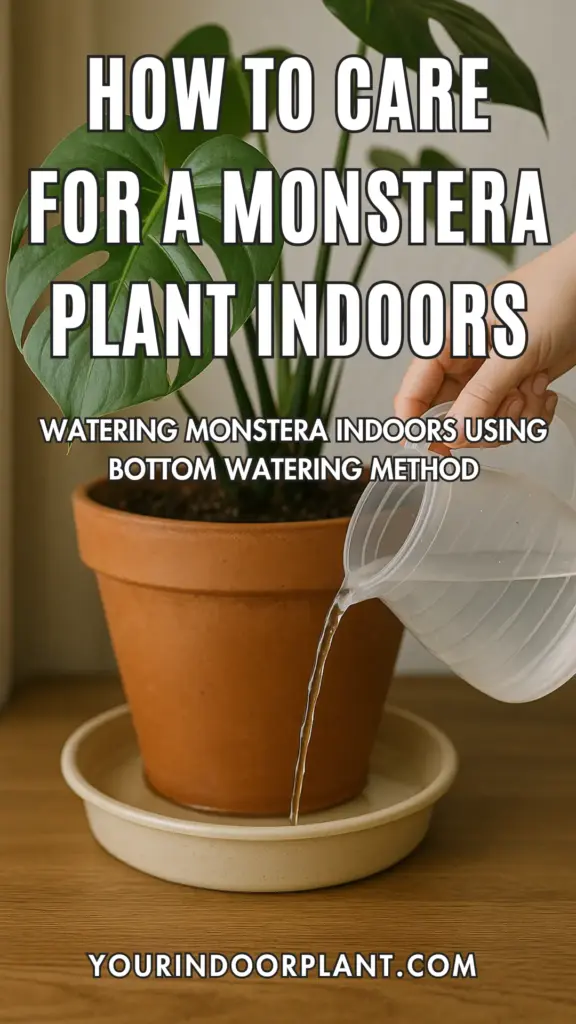
- Pebble trays: Place a tray filled with water and pebbles under the pot (just don’t let the roots sit in water).
- Plant grouping: Cluster your plants together to create a little humid microclimate—Monsteras love plant friends.
2.5 Fertilizing for Lush Foliage
Feeding your Monstera is like giving it a boost of energy. With the right nutrition, it will grow faster, push out bigger leaves, and develop those eye-catching fenestrations we all love. The key is timing and moderation.
When and how often to fertilize:
- Spring and summer: This is the Monstera’s active growing season, so feed about once a month.
- Fall and winter: Growth slows down, so cut back or pause fertilizing altogether.
How to choose the right fertilizer:
- Liquid fertilizers: Easy to mix into your watering routine.
- Water-soluble powders: Convenient and effective—just dissolve and go.
- Slow-release granules: Great if you prefer low-maintenance care, as they release nutrients steadily over time.
- Organic options: Fish emulsion or worm castings give a gentle, natural boost.
Pro tip: Always dilute fertilizers to about one-quarter to half the strength recommended on the label. Monsteras don’t need heavy feeding, and too much can damage their roots.
What to watch for:
- Over-fertilizing: Look for salt buildup on the soil, brown tips, or a plant that wilts even when the soil is moist.
- Nutrient deficiencies:
- Nitrogen: Older leaves turn yellow, and growth slows.
- Phosphorus: Leaves may look darker green or purplish, and roots can struggle.
- Potassium: Brown edges and weak stems are common.
My recommendation: A balanced liquid fertilizer, diluted to half strength, works beautifully once a month during the growing season. It keeps Monsteras happy without overwhelming them.
3. Cultivating Iconic Monstera Growth & Form
3.1 Encouraging Fenestrations: The Signature Splits
Ah, fenestrations. Those gorgeous splits and holes are the holy grail of Monstera care. It’s incredibly satisfying when your plant finally starts pushing out these mature leaves, which is a sure sign it’s happy and getting the right care. They rarely appear overnight.
Why Monstera leaves split:
- Maturity: Most Monsteras don’t produce fenestrations until they’re at least two or three years old.
- Light exposure: Plenty of bright, indirect light encourages those beautiful cuts to form.
- Genetics: Some plants naturally fenestrate more heavily than others, even with the same care.
What helps encourage fenestrations:
- Adequate light: A steady supply of indirect light is the number-one factor for larger, split leaves.
- Proper support: A moss pole or trellis gives your Monstera something to climb, helping it grow taller and produce bigger, more dramatic foliage.
- Patience: Young plants simply need time—fenestrations are a maturity milestone.
- Well-rounded care: Good watering habits, regular feeding, and healthy humidity all support strong, fenestrated growth.
When your Monstera has everything it needs, each new leaf tends to be bigger and showier than the last. With consistent care, those iconic splits will come naturally.
Why Monstera Leaves Aren’t Splitting (And How to Fix It)– Detailed troubleshooting guide for fenestration problems.
3.2 Providing Support: Poles, Stakes, and Trellises
Here’s a secret straight from the jungle: Monsteras are born to climb. If you really want to unlock their potential, giving them a support structure is a non-negotiable game-changer. A good support—like a moss pole—doesn’t just keep your plant upright, it actually encourages bigger leaves and more dramatic fenestrations.
Why support matters:
- Bigger leaves: Monsteras that climb often produce much larger, more mature foliage.
- Better fenestrations: Supported plants develop those striking splits and holes more readily.
- Stronger structure: Prevents heavy stems from snapping or the whole plant from toppling over.
- Natural growth pattern: Mimics how they grow in the rainforest, which keeps your Monstera healthier long-term.
Popular support options:
- Moss poles: The classic choice—perfect for aerial roots to grab onto and stay hydrated.
- Coir poles: A sustainable alternative to moss, with the same climbing benefits.
- Wooden stakes: Simple and tidy, ideal for smaller or younger plants.
- Trellises: Functional and decorative, allowing you to shape your Monstera in creative ways.
How to train your Monstera to climb:
- Guide gently: Use soft Velcro plant ties to loosely secure stems without damaging them.
- Encourage roots: Mist the pole or trellis to invite aerial roots to latch on.
- Take it slow: Let the plant grow at its own pace, giving gentle direction as it climbs.
As your Monstera grows, it will become heavier—so make sure your support is sturdy enough to handle the weight.
Product tip: A high-quality moss pole is one of the best investments for vertical growth and healthy aerial root attachment.
3.3 Pruning & Shaping Your Monstera
Pruning isn’t just about cutting your Monstera back—it’s about keeping it healthy, shaping it to fit your space, and even creating brand-new plants from the trimmings. A little strategic snip here and there goes a long way toward a bushier, happier Monstera.
When and why to prune:
- Size control: If your Monstera is taking over the living room, pruning helps keep it at a manageable size.
- Health boost: Snipping off yellow, damaged, or diseased leaves prevents wasted energy and keeps the rest of the plant strong.
- Better shape: Thoughtful pruning encourages fuller, more balanced growth, so your plant looks lush from every angle.
How to prune the right way:
- Use clean tools: Always sterilize your shears before making cuts—this keeps bacteria or fungus from sneaking into the plant.
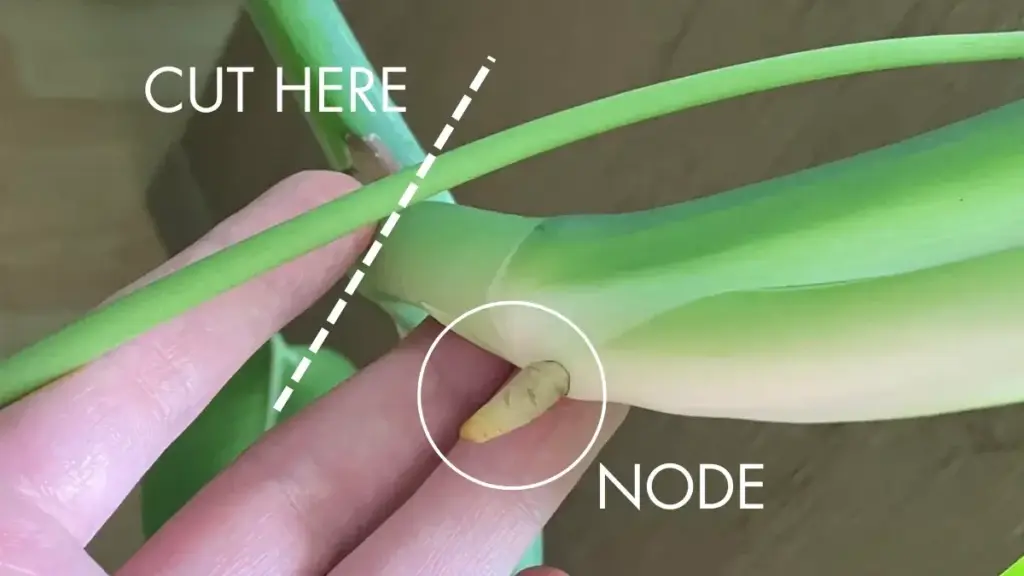
- Cut above a node: Nodes are those little bumps where leaves and roots grow. Making your cut just above one encourages fresh new growth.
- Cut at an angle: A diagonal cut heals faster and drains water better, helping your Monstera recover quickly.
Turning cuttings into new plants:
- Find the node: For a cutting to grow roots, it must include at least one node. No node, no new plant!
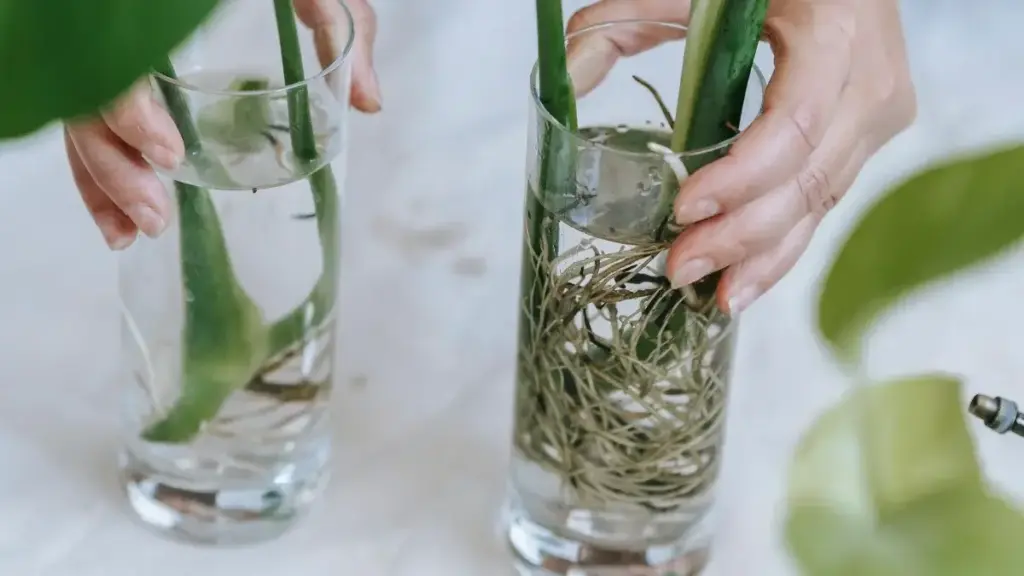
- Water method: Pop your cutting in a jar of clean water, change it every few days, and watch tiny roots appear in 2–4 weeks.
- Soil method: If you’re feeling confident, you can plant the cutting directly in soil. It’s a bit trickier, but with the right humidity, it works beautifully.
💡 Pro Tip: Don’t toss those healthy cuttings—propagation is a free way to grow your Monstera collection or share plants with friends.
What to Do When Monstera Gets Too Big (Easy Fixes) – Comprehensive strategies for managing overgrown plants.
3.4 Repotting: Giving Your Monstera Room to Grow
Repotting might sound intimidating, but it’s one of the best things you can do to keep your Monstera happy and growing strong. Giving those roots a little extra space prevents your plant from becoming root-bound and keeps growth vigorous for years to come.
How to know it’s time to repot:
- Roots poking out of drainage holes: A clear sign your Monstera has outgrown its current home.
- Water rushes straight through: Compacted or crowded roots don’t allow the soil to absorb moisture properly.
- Slowed growth: If care is on point but your plant stalls, it may be stuck in a cramped pot.
- Top-heavy plant: A wobbly Monstera usually means the pot can’t keep up with its size.
Best seasons to repot:
- Spring (best choice): Perfect timing, since your plant will enter its active growing season.
- Early summer: A good backup if you miss spring.
- Avoid winter: Monsteras rest during colder months and won’t establish well in fresh soil.
Step-by-step repotting guide:
- Pick the right pot: Go 1–2 inches wider than the current pot, and make sure it has drainage holes.
- Prepare soil: Use a chunky, well-draining mix (orchid bark + perlite + peat-based soil works beautifully).
- Remove gently: Tip your Monstera out and carefully loosen tight roots with your hands.
- Check roots: Trim away anything black, mushy, or damaged before replanting.
- Replant at the same depth: Don’t bury the stem deeper than it was before. Fill with fresh mix.
- Water lightly: Give it a gentle drink and place it in bright, indirect light to settle in.
Tips for choosing the right pot:
- Size matters: Only size up gradually to avoid soggy soil and overwatering issues.
- Drainage first: Always pick a pot with several drainage holes, no matter the material.
- Think stability: Large Monsteras often need a heavier pot (like ceramic or terracotta) to prevent tipping.
💡 Pro Tip: Most Monsteras are happiest with repotting every 1–2 years, or whenever you see root-bound signs. Fresh soil and a little more room make a world of difference.
4. Troubleshooting Common Monstera Problems & Mistakes
4.1 Diagnosing Leaf Problems: Yellowing, Browning, and Black Spots
Your Monstera is pretty chatty, you know. It won’t send you a text, but it will communicate its problems clearly through its leaves—you just have to learn to listen.
A little yellowing, browning, or curling isn’t just random—it’s your plant’s way of letting you know something’s off. By paying attention to these visual cues early, you can catch small issues before they turn into big problems.
In short, your Monstera’s leaves are like its health report card—learning to read them makes you a much better plant parent.
Comprehensive Monstera Leaf Problem Diagnostics Table:
| Symptom | Common Causes | Solutions |
|---|---|---|
| Yellowing Leaves | Overwatering, underwatering, low humidity, nutrient deficiency, insufficient light | Adjust watering schedule, check drainage, fertilize appropriately, optimize light conditions |
| Brown Tips/Edges | Low humidity, underwatering, mineral buildup, tap water, fertilizer burn | Increase humidity, water thoroughly, use filtered water, flush soil to reduce fertilizer |
| Drooping Leaves | Underwatering, overwatering, root rot, temperature stress | Adjust watering, check roots, inspect for pests, ensure stable temperatures |
| Black Spots/Edges | Overwatering, fungal infection, cold damage, physical injury | Improve drainage, apply fungicide if needed, move from cold drafts, check for physical damage |
| Small Non-Splitting Leaves | Inadequate lighting, plant immaturity, nutritional deficits, no support | Provide bright indirect light, install moss pole, fertilize, ensure proper age |
4.2 Why Is My Monstera Droopy? Unraveling the Causes
Once you’ve figured out the cause, you can usually turn things around quickly:
- Underwatering: Give your Monstera a deep, thorough drink until water flows from the drainage holes. Within a day or two, the leaves should perk back up.
- Overwatering: Hold off on watering and improve airflow around the pot. In severe cases, repot into fresh, well-draining soil.
- Root rot: Trim away all mushy, dark roots with sterilized scissors and repot in fresh mix.
- Temperature shock: Move your plant away from drafty windows, air conditioners, or heaters. Keep conditions stable.
- Transplant shock: Be patient. Keep watering light, avoid fertilizer for a few weeks, and give your plant time to re-establish roots.
Pro tip: Monsteras bounce back best when you catch drooping early. A quick soil check with your finger or a moisture meter can prevent most watering-related droops before they even happen.
Why Is My Monstera Droopy? 7 Main Causes & Fixes – Comprehensive guide covering all aspects of drooping diagnosis and treatment.
4.3 Preventing & Fixing Common Monstera Mistakes
Hey, it happens to the best of us. I’ve overwatered, I’ve scorched leaves, I’ve forgotten to fertilize. The goal isn’t perfection; it’s learning from the oops moments. Monsteras are forgiving plants, which is why they’re such a favorite for beginners—but they still have their limits.
Here are the mistakes I see most often (and how to dodge them):
- Overwatering: Easily the number one culprit. Always let the top few inches of soil dry before reaching for the watering can.
- Not enough light: Without steady bright, indirect light, your Monstera will stretch out and produce small, plain leaves with no splits.
- Heavy, soggy soil: Monsteras hate wet feet. A chunky, airy mix (with bark, perlite, or pumice) keeps the roots happy.
- Forgetting humidity: These tropical beauties don’t love dry, heated air. A little extra moisture goes a long way for lush growth.
- Fertilizer mistakes: Too much burns the roots, too little stunts the plant. Stick to a balanced, diluted feed during the growing season.
Big picture tip: Consistency is everything. If you provide stable light, smart watering, and the right soil, your Monstera will reward you with strong growth and those gorgeous fenestrated leaves all year long.
7 Common Monstera Plant Mistakes (And How to Fix Them) – Extensive list covering identification and correction of frequent mistakes.
4.4 Pest & Disease Management
When it comes to Monsteras, prevention really is the best medicine. A healthy, happy plant is much less likely to attract pests or fall victim to disease. But even the best-cared-for plants can get an unwelcome visitor now and then—so let’s go over what to watch for and how to act fast.
Common Monstera Pests
- Spider mites: Love dry air; they leave tiny speckled damage and sometimes fine webs.
- Mealybugs: Look like little bits of cotton hiding in leaf joints and stems.
- Thrips: Harder to spot, but their silver streaks and scars on leaves are a giveaway.
- Scale insects: Appear as small bumps stuck on stems or leaves.
How to Treat Them
- Organic fixes: Neem oil, insecticidal soap, or even releasing beneficial bugs like ladybugs.
- Physical removal: Wipe leaves with a damp cloth, give your Monstera a lukewarm shower, or prune heavily infested areas.
- Chemical backup: Systemic insecticides can be used in severe cases, but I recommend saving them as a last resort.
Disease Watchlist
- Fungal infections: Usually show up as dark, fuzzy spots or patches of rot.
- Bacterial issues: Wet-looking spots, often with a yellow halo around them.
- Root rot: The big one to avoid—caused by overwatering and poor drainage. Roots will look black, mushy, and smell unpleasant.
Prevention is Key
- Keep the air moving with a small fan or by spacing plants apart.
- Quarantine any new plant for at least two weeks before introducing it to your collection.
- Do quick weekly “wellness checks” so you catch problems before they spread.
- Most importantly: keep your Monstera in stable, healthy conditions. A strong plant is your best defense against pests and disease.
5. Advanced Monstera Care & Propagation
5.1 Understanding and Managing Aerial Roots
Let’s talk about those weird, wild aerial roots. They might look a little alien, but they’re actually a superpower. These long, sometimes wild-looking roots can puzzle plant parents at first, but they’re an important part of how the plant grows—especially in the wild.
Why Monsteras Grow Aerial Roots
- Climbing support: They latch onto trees, moss poles, or other surfaces for stability.
- Extra absorption: In nature, they help soak up moisture and nutrients from the air.
- Backup system: They act as a safety net, supporting the main root system underground.
Should You Cut Them?
For the most part, leave them be. Cutting aerial roots removes an important tool your Monstera uses to grow strong and healthy.
- Okay to trim: If the roots are damaged, diseased, or making it hard to manage your space.
- How to prune safely: Always use clean, sharp scissors and snip just above a node.
How to Guide Aerial Roots
- Toward support: Gently tuck them onto a moss pole or trellis.
- Into the soil: You can guide them into the potting mix for extra stability.
- With a little mist: Keeping the support slightly damp encourages roots to attach.
Why It’s Worth Encouraging Them
Monsteras with strong, anchored aerial roots aren’t just healthier—they’re showstoppers. Once those roots grab onto a moss pole or support, the plant starts pushing out bigger, shinier leaves with deeper splits. This is the secret behind those dramatic Instagram-worthy Monsteras everyone admires.
Think of it like giving your plant a tree to climb, just like in its rainforest home. When you guide the aerial roots and provide the right structure, you’re helping your Monstera live its best life indoors—strong, stable, and full of those iconic fenestrations.
5.2 Propagating Your Monstera: Expanding Your Collection
Ready for the magic trick? Propagating your Monstera is not only easy, it’s downright addictive. There’s nothing quite like the thrill of growing a whole new plant for free.
Ready for the magic trick? Propagating your Monstera is not only easy, it’s downright addictive. There’s nothing quite like the thrill of growing a whole new plant for free. It’s the perfect way to expand your own collection or share cuttings with fellow plant lovers.
The Main Propagation Methods
- Water propagation: The easiest way for beginners, plus you get to watch the roots grow in real time.
- Soil propagation: A little trickier, but plants sometimes establish faster since they start in soil right away.
- Air layering: A more advanced technique where you root the cutting while it’s still attached to the mother plant.
Step-by-Step: Water Propagation
- Pick a cutting: Choose a stem with at least one node (that little bump where roots can grow) and ideally an aerial root.
- Make the cut: Use sharp, clean shears and snip just below a node.
- Set it up: Place the cutting in a clear glass or jar so you can keep an eye on the roots.
- Water placement: Submerge only the node—keep leaves above water.
- Find the right spot: Bright, indirect light works best.
- Change the water: Refresh every 3–5 days to avoid bacteria buildup.
- Wait for roots: Within 1–2 weeks, roots should appear. Once they reach 2–3 inches long, you can pot the cutting in soil.
Step-by-Step: Soil Propagation
- Prepare the cutting: Same as water propagation—make sure you include at least one node.
- Mix the soil: Use a light, airy mix like perlite and peat or vermiculite.
- Plant it: Bury the node and any roots, keeping the stem and leaves above the soil.
- Water lightly: Keep the soil slightly damp but never soggy.
- Give it the right environment: Place in indirect light and, if possible, increase humidity to speed things up.
- Be patient: It can take 4–8 weeks before you see new leaves. That’s when you’ll know your cutting has settled in.
Best timing tip: For the highest success rate, take cuttings in spring or early summer, when your Monstera is already in growth mode.
5.3 Advanced Styling & Display Ideas
Your Monstera doesn’t just have to be a plant—it can be the centerpiece of your home. With a little creativity, you can turn it into a living design element that elevates any space. Think of it as part horticulture, part interior decorating.
Creative Ways to Show Off Your Monstera
- Hanging baskets: Smaller types like Monstera adansonii look stunning trailing from a high perch.
- Moss poles for drama: A tall moss pole not only supports your plant but also creates an eye-catching statement piece.
- Living décor: Place a large Monstera in a bright corner to act like natural architecture in your room.
- Plant groupings: Pair your Monstera with other tropicals to create a lush, layered “jungle nook.”
Make It Your Own
- Unique containers: Swap the standard nursery pot for a chic ceramic, woven basket, or modern planter that fits your style.
- Training techniques: Try shaping or guiding your Monstera’s growth—whether upright, climbing, or slightly sprawling—for different vibes.
- Companion planting: Combine with plants that share similar needs, like Calatheas or Philodendrons, for a full tropical effect.
- Seasonal styling: Add fairy lights in winter or let it shine solo in summer—it’s a plant that adapts beautifully to the seasons.
Pro tip: Some plant parents give their Monstera a summer vacation outdoors. If you try this, move it slowly into brighter conditions and always shield it from harsh direct sun to avoid leaf burn.
FAQ
-
How often should I water my Monstera?
Watering frequency varies based on environmental factors, but typically occurs when the top 2-3 inches of soil are dry to the touch. It’s usually safer to underwater slightly than to overwater—just be sure the soil dries out before the next watering.
-
Why aren’t my Monstera leaves splitting?
Lack of fenestrations is often due to insufficient light, immaturity (young plants rarely split), or inadequate humidity and nutrients. Ensure your plant gets bright indirect light and consider providing support as it matures. New leaves will be larger and more fenestrated with proper care.
-
What’s the best soil for a Monstera?
Monsteras thrive in well-draining, aerated soil. A good mix typically includes perlite or pumice, and orchid bark or coco coir to prevent compaction and ensure roots get enough oxygen. The guide to caring for these plants emphasizes proper drainage above all.
-
Can I put my Monstera outside?
Yes, you can move your Monstera outside during warm months in humid climates, provided they are in a shaded or partially shaded spot away from direct sunlight. If temperatures dip under 60°F (15°C), it’s time to bring your plant inside where it’s warmer. Gradual acclimatization is key.
-
My Monstera leaves are turning yellow. What does that mean?
Yellowing leaves, especially lower ones, often indicate overwatering or poor drainage. But keep in mind—yellowing leaves might also point to underwatering, lack of nutrients, or simply the natural aging process. Assess your watering schedule and soil moisture first.
Conclusion
So, what’s the final verdict? A happy Monstera boils down to nailing the big four: light, water, a chunky soil mix, and something to climb. With the right setup, your plant will reward you with bold, fenestrated leaves and lush growth that make it a true statement in your home.
You’ve now got the know-how to turn that hesitant plant parent energy into full-blown Monstera confidence. You’ve got this! Start by reviewing your care routine, fixing any gaps, and trying propagation to grow your collection.
Remember—plant care is a journey. Every Monstera is unique, and learning to “read” your plant comes with time. Celebrate new leaves, enjoy the process, and take pride in creating a thriving tropical oasis that will only get better year after year.
