
Monstera Drainage Hacks: 8 Practical Fixes for Soggy Soil and Healthy Roots

If your Monstera soil stays wet for too long, the solution usually isn’t more gravel at the bottom of the pot. Good drainage comes from the entire root environment: a container that lets excess water escape, a potting mix that keeps enough air around the roots, and a watering routine that matches how quickly your plant actually dries.
After growing and troubleshooting Monsteras indoors, I’ve found that drainage problems are much easier to solve when you first figure out why the soil is staying wet instead of immediately changing the soil or buying a different pot.
What Is the Best Way to Improve Monstera Drainage?
The most reliable setup is simple:
Use a pot with drainage holes, a loose and chunky growing medium, and water thoroughly only when the plant has dried enough to need it.
For most indoor Monsteras, a mix containing quality potting mix or coco coir, orchid bark, and an airy material such as perlite or pumice is a good starting point.
But there isn’t one magic Monstera soil recipe.
The goal is to create a root environment that holds enough moisture without remaining saturated and airless for too long.
This matches the guidance from the University of Connecticut’s Monstera deliciosa care guide, which recommends a well-draining potting mix and warns against keeping Monstera in standing water.
1. Check Whether Your Monstera Really Has a Drainage Problem
Before repotting, check what is actually happening inside the pot.
A Monstera doesn’t necessarily have a drainage problem just because water takes a little time to leave the bottom of the container. The more important question is whether the root zone remains excessively wet and poorly aerated afterward.
Here are the signs I look for:
- Water sits on the surface instead of soaking into the mix.
- The pot drains unusually slowly after watering.
- The soil remains noticeably wet for an extended period.
- The growing medium has become compacted.
- The drainage hole is blocked.
- The decorative outer pot is holding runoff.
- The soil develops a sour or unpleasant smell.
- Older leaves start yellowing while the soil is still wet.
- Roots feel soft or mushy when inspected.

Yellow leaves by themselves do not prove that poor drainage is the cause. Monstera leaves can yellow for several different reasons, so I always look at the soil and root condition as well.
If your plant has yellow leaves while the potting mix remains wet, use our guide to Monstera leaves turning yellow to work through the possible causes.
Don’t use a fixed number of days as your only test
You may see advice saying Monstera soil should dry within four or five days. I wouldn’t use that as a universal rule.
A small Monstera in a warm, bright room can dry much faster than a large plant in a cooler, darker room. Pot size, growing medium, temperature, humidity, and light all affect drying speed.
Instead of asking: “Has it been five days?”
Ask: “Is the root zone still wetter than it should be for this plant and these conditions?”
That is a much more useful way to judge drainage.
2. Use a Pot With a Real Drainage Hole
This is the first change I’d make when a Monstera is struggling with excess moisture.
A drainage hole gives excess water somewhere to leave the container. Without one, even a well-designed potting mix has limited ability to get rid of water from the bottom of the container.
One of my favorite setups for indoor Monsteras is:
Monstera → nursery pot with drainage holes → decorative cachepot
You don’t have to give up a beautiful ceramic planter just because it doesn’t have a drainage hole.
Use the decorative planter as the outer container and keep the Monstera itself in a removable nursery pot that drains freely.
After watering, let the inner pot drain completely before returning it to the cachepot. If water collects in the outer container, empty it rather than leaving the inner pot sitting in standing water.
This is also consistent with Costa Farms’ Monstera care guidance, which recommends avoiding standing water and emptying water that collects in a decorative outer pot.
What If My Favorite Pot Has No Drainage Hole? Don’t plant the Monstera directly into it. Use it as a cachepot.
That gives you the decorative appearance you want while keeping control over the moisture around the roots.
3. Build a Chunky Monstera Soil Mix

The next part of the drainage equation is the growing medium.
Monstera roots need moisture, but they also need oxygen. A mix that becomes dense and stays saturated can create a poor root environment even when the container itself has a drainage hole.
A practical starting mix is:
- 40% quality indoor potting mix or coco coir
- 30% orchid bark
- 30% perlite or pumice
You don’t need to measure these ingredients with laboratory precision. The purpose of each ingredient matters more than hitting an exact percentage.
- Potting mix or coco coir helps retain moisture.
- Orchid bark adds larger particles and air spaces.
- Perlite or pumice increases porosity and helps keep the mix from becoming overly dense.
Penn State Extension’s guide to Monstera as a houseplant similarly recommends a well-draining soilless potting mix rich in organic matter and notes that bark or perlite can be added to a purchased mix.
How Should Good Monstera Soil Feel?
When wet, the mix should still have visible structure. You don’t want it to collapse into something that behaves like mud and remains compressed after watering.
When you handle it, you should be able to see and feel the larger particles. That’s more useful than chasing one “perfect” Monstera soil recipe.
4. Skip the Rock Layer at the Bottom

Adding gravel or pebbles underneath potting soil is one of the most persistent container-gardening myths.
The problem is simple: A layer of rocks does not create a drainage hole.
If the container itself cannot release excess water, putting rocks underneath the soil doesn’t give that water a proper exit.
Instead of creating a drainage layer, focus on the things that actually control the root environment:
- Use a container with drainage holes.
- Use an appropriately porous growing medium.
- Avoid unnecessarily large pots.
- Keep drainage openings clear.
- Remove standing water from saucers and cachepots.
If a pot has a large drainage opening and you’re worried about soil escaping, a small piece of mesh can help hold the growing medium in place while still allowing water to leave.
The goal isn’t to build a thick drainage layer.
The goal is to give excess water a clear path out of the container.
5. Choose Pot Material Based on How Your Soil Dries
Pot material can influence how quickly moisture leaves the root zone, but it shouldn’t be considered separately from the soil, pot size, light, and growing conditions.
Terracotta
Terracotta is porous and can lose moisture through the sides of the container.
That can be useful if your Monstera’s soil tends to remain wet for too long.
Plastic
Plastic containers don’t lose moisture through their sides, so the growing medium may stay moist longer.
That isn’t automatically a problem.
Plastic pots can work very well for Monsteras when the potting mix, container size, light level, and watering routine are appropriate.
Glazed Ceramic
Glazed ceramic is generally nonporous. Again, the most important feature isn’t the material itself, the pot needs a functioning drainage hole.
So instead of asking: “Which pot material is best for Monstera?”
I prefer to ask: “Which pot material makes sense for how quickly my Monstera’s soil is drying?”
That makes choosing a container much easier.
6. Change How You Water, Not Just What You Put in the Pot
A well-designed soil mix can still become waterlogged if you keep watering before it has had enough time to dry.
This is one of the easiest drainage mistakes to make with an indoor Monstera. Don’t water simply because it’s the same day of the week. Check the soil first.
A wooden skewer or chopstick can be useful for checking moisture deeper in a larger pot. You can also use your finger for smaller containers or a moisture meter as an additional reference.
Costa Farms’ Monstera watering guide recommends using a wooden skewer or chopstick to help assess moisture deeper in the pot rather than relying on a fixed watering schedule.
If you’re unsure about the timing, our guide on how to know if a Monstera plant needs water walks through the checks I use before watering.
When You Do Water
Water thoroughly enough to moisten the root ball rather than giving the plant a tiny splash.
Then:
- Let excess water drain from the bottom.
- Empty the saucer or cachepot.
- Let the growing medium dry to the appropriate level before watering again.
Exactly how much the soil should dry depends on the plant, season, pot, and growing conditions.
The University of Connecticut’s Monstera care guide recommends allowing the upper portion of the soil to dry between waterings, while Penn State Extension recommends allowing the top 1–2 inches of soil to dry.
The important lesson isn’t a particular number.
Don’t keep the root zone continuously saturated.
7. Fix a Monstera That Is Already Sitting in Soggy Soil
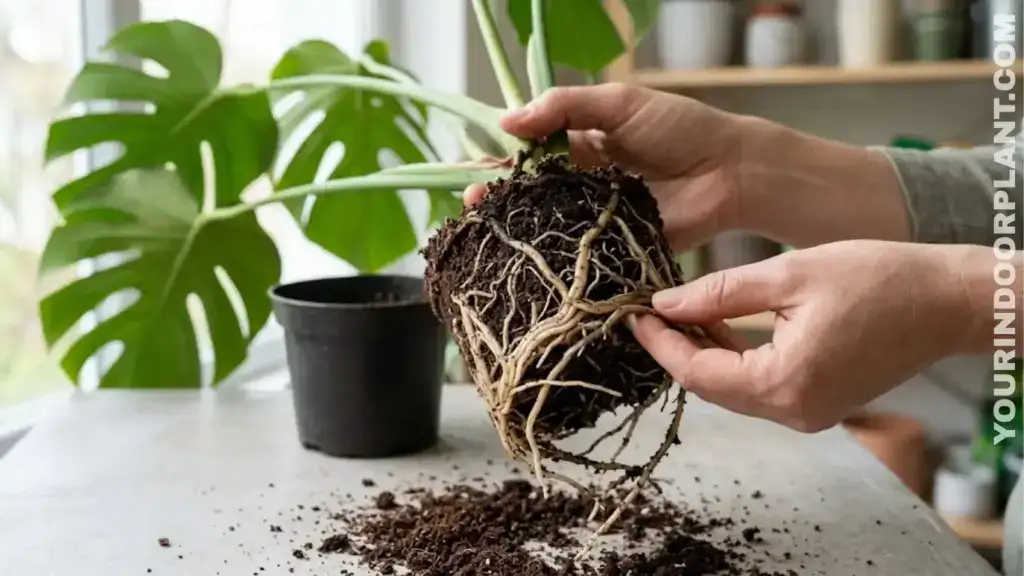
If the soil is staying wet and your Monstera is beginning to decline, first determine whether the problem can be corrected without disturbing the roots.
Check:
- Does the pot actually have a drainage hole?
- Is the hole blocked?
- Is the plant sitting inside water?
- Is the pot much larger than the root system?
- Has the potting mix become compacted?
- Has the plant’s light level recently changed?
- Are the roots showing signs of damage?
If the container and soil are fundamentally unsuitable, repotting may be the better solution.
When Repotting Is Necessary
Remove the plant carefully and inspect the root system.
Healthy roots should have a firm texture. Roots that are clearly dead or rotting may be soft and deteriorating.
Don’t remove roots simply because their color isn’t perfectly white. Root color can vary depending on the plant and growing medium. Texture and condition are more useful clues than color alone.
If you find genuine root rot, remove clearly damaged tissue with clean tools and move the plant into fresh, appropriately airy growing medium and a container with working drainage.
For the complete process, use our step-by-step guide to repotting a Monstera. If the root damage is more extensive, our guide on how to treat root rot in houseplants covers the broader recovery process.
Don’t Automatically Repot Every Slightly Wet Monstera
This is important. If the plant is healthy, the pot drains properly, and the soil is simply taking a little longer to dry because of seasonal conditions, an emergency repot can create more stress than it solves.
Diagnose first, then change the part of the setup that is actually causing the problem.
8. Keep the Drainage System Working
Good drainage isn’t something you fix once and forget.
As the plant grows, the potting mix settles, roots occupy more of the container, and organic components gradually break down.
I periodically check:
- whether the drainage hole is clear
- whether water still exits normally
- whether the soil has become compacted
- whether the saucer is holding water
- whether the cachepot contains runoff
- whether the plant was recently moved to a much larger pot
If drainage suddenly becomes much slower than it used to be, don’t immediately blame the plant.
Look at the container and growing medium first.
A drainage problem can develop gradually even when the original setup was good.
Can You Improve Monstera Drainage Without Repotting?
Sometimes. If the problem is a blocked drainage hole, standing water in the saucer, or water trapped in a decorative cachepot, you may be able to correct the problem without disturbing the plant.
But if the entire growing medium has become compacted and remains wet deep inside the pot, simply sprinkling perlite onto the surface won’t rebuild the structure around the roots.
At that point, replacing the old growing medium is usually the more meaningful fix. This is why I don’t recommend treating perlite as a universal “quick fix” for every drainage problem.
Do Monstera Need Drainage Holes?
Yes. Drainage holes make Monstera care much easier to manage. The hole provides an actual exit for excess water.
If you love a planter without drainage, use it as a decorative outer pot and keep the Monstera in a removable inner container with drainage.
This gives you much better control over watering and makes it easier to inspect the roots or repot the plant when necessary.
The University of Connecticut’s Monstera care recommendations specifically emphasize well-draining media and avoiding standing water.
Should I Put Rocks in the Bottom of a Monstera Pot?
No. Not as a drainage solution. Rocks don’t replace a drainage hole, and they don’t turn a sealed container into a normally draining pot.
If you want to prevent soil from escaping through a large drainage opening, use a small piece of mesh instead.
Spend your effort on the three things that actually matter: container drainage + appropriate growing medium + appropriate watering.
How Do I Know If Monstera Soil Drains Badly?

Look at the combination of symptoms rather than one sign. Poor drainage becomes more likely when:
- water remains on the surface
- the mix is compacted
- the pot drains unusually slowly
- the root zone stays saturated for an extended period
- the soil develops an unpleasant smell
- the plant shows stress while the soil remains excessively wet
- roots become soft or deteriorate
Yellowing alone isn’t enough to diagnose poor drainage. The soil condition and root condition tell you much more.
Can I Use a Self-Watering Pot for a Monstera?
You can, but a self-watering pot isn’t automatically a solution for poor drainage.
Its purpose is to provide a controlled water supply, not to make an unsuitable growing medium or chronically wet root zone safe.
If your Monstera already struggles with excess moisture, I’d first learn how quickly its current soil dries before switching to a self-watering system.
A self-watering setup can work when the growing medium, reservoir, light, temperature, and plant size are all appropriate. But if your goal is simply to fix soggy soil, start with the basics first.
The Simple Monstera Drainage Setup That Works
After troubleshooting Monsteras indoors, I’ve found that drainage doesn’t need to be complicated.
The setup I’d start with is:
A correctly sized pot with drainage holes + a loose, chunky growing medium + thorough watering + enough drying between waterings + no standing water.
If the soil stays wet, don’t immediately buy another drainage additive, ask what changed:
- Is the pot too large?
- Has the soil compacted?
- Is the drainage hole blocked?
- Is the plant sitting in a cachepot full of water?
- Has the light level dropped?
- Are you watering on a schedule instead of checking the soil?
Once you identify the actual cause, the solution is usually much simpler and that’s the real secret behind good Monstera drainage:
You’re not trying to make the soil dry as fast as possible. You’re trying to create a root environment that holds enough moisture while still allowing excess water and air to move through the pot.
For the bigger picture, see our complete Monstera care guide to understand how drainage fits together with watering, light, soil, and long-term growth.
Sources and Further Reading
The recommendations in this guide were checked against established horticultural references and professional plant-care guidance:
- University of Connecticut — Monstera deliciosa: growing medium, watering, root health, and avoiding standing water.
- Penn State Extension — Monstera as a Houseplant: watering, potting media, bark, perlite, and root-rot prevention.
- Royal Horticultural Society — Monstera deliciosa: growing conditions and the importance of moist but well-drained conditions.
- Costa Farms — How to Care for a Monstera Houseplant: practical guidance on checking moisture, watering, drainage, standing water, and repotting.