
Houseplant Care Guide: Advanced Tips & Problem-Solving
Are your houseplant collection just surviving? I used to be there, nursing sad, crispy leaves and wondering what I was missing.
When I first started, I thought I just had a black thumb. But it turned out my plants weren’t dying from bad luck—they just needed more than the generic advice I kept reading.
This guide is for you. We’ll cut through the guesswork and give you the confident, expert-level knowledge to finally decode your plant’s signals, solve problems before they start, and get even your trickiest rare varieties to not just live, but truly prosper. Let’s get growing.
The Foundational Pillars of Advanced Houseplant Care
1. Light: Understanding & Optimizing for Growth
Light is everything for plants. When I finally bought a light meter, I realized my so-called ‘bright spot’ was basically a shady cave. No wonder my fiddle leaf fig sulked for months.
For your plants to truly thrive, you need to move beyond vague terms and learn to speak about light in its own language: intensity, duration, and spectrum.
Understanding Light Intensity: The Numbers Game
Most of us just guess at light. I used to do the same. But advanced care means measuring. Light intensity is measured in foot-candles (fc) or lux—and a simple app like Photone can give you real numbers in seconds.
- Low-Light Plants (e.g., Snake Plants, ZZ Plants): The survivors. They can get by with 25–100 fc, but won’t grow much.
- Medium-Light Plants (e.g., Philodendrons, Monsteras, Pothos): The workhorses. They thrive with 100–500 fc to push out those big, beautiful leaves.
- High-Light Plants (e.g., Succulents, Areca Palm, Podocarpus): The sun-worshippers. They demand a strong 500–1,000 fc to grow compactly and perform their best.
- Direct sunlight (e.g., Ponytail, Fiddle Leaf Fig, Norfolk Island Pine): The true sun‑seekers. They need over 1,000 fc and at least four hours of unfiltered sun each day.
Measure Light Like a Pro
The game-changer for me was a simple light meter app on my phone (Photone is a fantastic and accurate choice). I spent a Saturday mapping out the light in every corner of my apartment, and the results were shocking. The spot I’d been keeping my fiddle leaf fig was getting less than half the light it craved. No wonder it was dropping leaves!
Pro Tip: Always measure at leaf level, and check at different times of day to see how the light shifts with the sun’s movement.
I later stumbled on a guide from the University of Florida that backed this up—light isn’t just about a ‘bright spot,’ it’s about measurable intensity, duration, and spectrum. That explained a lot of my earlier struggles.
Strategic Plant Placement and Seasonal Shifts
Placement is where your knowledge meets strategy.
- South or West-Facing Windows: Sun-drenched. Perfect for your high-light plants.
- East-Facing Windows: Bright but gentle. The ideal spot for most medium-light tropical foliage plants.
- North-Facing Windows or Room Interiors: Dimmer. Reserve these for your low-light champions.
In winter, don’t be afraid to move plants much closer to windows to capture the weak sun. In the harsh summer, a sheer curtain can be the perfect filter to prevent leaf scorch.
Choosing and Using Grow Lights
When the sun isn’t enough—and for most of us in winter, it isn’t—grow lights are non-negotiable.
- LED Grow Lights: Energy-efficient, cool-running, and long-lasting. I grabbed a Sansi bulb on Amazon. It runs cool and the plants love it, though I wish the clamp was sturdier.
- Fluorescent Lights (T5/T8): Affordable and effective for raising seedlings or lighting shelves of foliage plants. Barrina T5 LED strips are a popular choice for their even, bright output.
- Distance Matters: Keep LEDs 12-24 inches away from foliage and fluorescents 6-12 inches away to ensure your plants get the intensity they need.
The real key is consistency. I put all my grow lights on inexpensive timers for a set 12-14 hours a day. My plants don’t have to guess if the sun’s coming out, and neither do I. This reliable daily “sun” is the ultimate trigger for vigorous, healthy growth.
When you understand and control light at this level, you stop reacting to problems and start creating the exact conditions your plants need to not just survive, but truly thrive.
2. Watering: Precision & Plant-Specific Needs
Water is just as critical as light. I learned this the hard way after killing my first maidenhair fern with kindness—by overwatering it.
It’s the most common mistake and the quickest way to kill a houseplant. Rigid watering schedules tripped me up for years. The real trick? Learning your plant’s unique thirst cues and responding to those instead.
Ditch the Guesswork: How to Actually Know When to Water
Forget the finger test as your only tool. It only measures the top inch, leaving the root zone a mystery. To truly know, you need better tools, so how do you actually know when to water? Let’s start with the simplest test I use every single week: the pot lift.
- The Pot Lift Method: This is my go-to. A pot that’s light as a feather is thirsty. A pot that’s heavy still has plenty to drink. This simple technique sharpens your instincts faster than anything else. I still remember the first time I picked up a pot and it felt oddly weightless—like carrying an empty mug. That’s when it clicked: my plant wasn’t sad, it was simply thirsty.
- Moisture Meters: For a precise reading right at the root level, a simple moisture meter (like the XLUX T10) is a worthwhile investment. It removes all doubt.
- Read the Leaves: Get hands-on. A well-hydrated plant’s leaves feel plump and firm—a sign of good turgor pressure. A thirsty plant’s leaves feel limp, flexible, or even wrinkly.
Understand Roots to Understand Thirst
Not all roots drink the same way[1]. This was the revelation that changed my watering for good.
- Fibrous Roots: I used to drown my Calathea because I treated it like a succulent. Once I learned it had shallow, fibrous roots that can’t hold much water, it clicked—this plant needs frequent, gentle sips, not deep soaks.
- Taproots or Tuberous Roots (e.g., Succulents, Snake Plants): These are desert survivors designed to store water deep down. They want a boom-and-bust cycle: a thorough, deep soaking followed by a period of complete drought. Soaking them too often is a death sentence.
The Hidden Factor: Water Quality
After deep research into why my Calatheas persistently developed crispy brown tips despite optimal care, I discovered a crucial factor often overlooked by gardeners. I found an article from ABC Gardening that notes,
“Tap water suits the majority of houseplants, but sensitive varieties like cordylines, dracaenas, spider plants, and marantas may react poorly” .
This resonated deeply with my experience. The culprit was my tap water. The chemicals and minerals in our water matter more than you think.
- Chlorine: Can evaporate if water is left out for 24 hours.
- Chloramine & Fluoride: Will not evaporate. These are common in municipal water and can cause leaf tip burn in sensitive plants like Dracaenas, Spider Plants, and Calatheas.
For my fussy plants, I use filtered water, rainwater, or even aquarium water (left out for 24 hours to dechlorinate). It’s a small hassle for a huge payoff in pristine leaves.
Watering Methods: Top vs. Bottom
How you water is as important as when.
- Bottom Watering: This is my preferred method for most plants. I place the pot in a tray of water and let the soil wick moisture up from the bottom. This encourages deep, strong root growth and keeps the topsoil dry, which discourages fungus gnats. It’s brilliant.
- Top Watering: The classic method. Do this occasionally to help flush out mineral salts that build up from fertilizer. Water slowly and evenly until it runs freely out the drainage holes.
Pro Tip: If you bottom water, make sure to top water every month or so to flush out any accumulated salts that can build up in the soil.
When you combine these techniques—listening to your plant, understanding its roots, caring about water quality, and choosing your method—watering transforms from a chore into a finely tuned skill. It’s the moment you stop fighting your plants and start working with them.
3. Humidity & Airflow: Creating the Ideal Microclimate
Most of us fuss endlessly about watering and light, but I didn’t give humidity a second thought—until my Calathea leaves turned crispy like potato chips.
Mastering humidity and airflow is what separates a nice collection from an extraordinary, thriving jungle.
Why Humidity Isn’t Just About “Moist Air”
When the air is too dry, your plant loses water faster than its roots can keep up — that’s why those crispy edges appear.
- Low Humidity (<40%): The air is thirsty and pulls moisture from the leaves faster than the roots can replace it. The result? Crispy brown edges, curled leaves, and stalled growth.
- High Humidity (>70% without airflow): Transpiration slows to a halt. Water pools in the soil and on leaves, creating a petri dish for fungus gnats, powdery mildew, and root rot.
How to Measure and Monitor Accurately
Guessing humidity is a fool’s errand. I was convinced my living room was fine until a digital hygrometer revealed a desert-like 35%.
A good hygrometer is non-negotiable. I use the Govee Thermometer Hygrometer that tracks highs and lows, so I can see the daily fluctuations that stress plants out.
How to Increase Humidity Effectively
Not all methods are created equal. Here’s what actually works:
- The Gold Standard: A Humidifier. This is the only way to reliably raise humidity for a whole room. Ultrasonic humidifiers are quiet and effective but need weekly cleaning to prevent mold. Evaporative models are more self-regulating but can be a bit noisier.
- The Supporting Actors: Pebble Trays & Grouping. Placing water trays near plants or grouping them together creates a slightly more humid microclimate. Don’t expect miracles, but it gives a small boost—maybe 5-10%.
- The Terrarium Solution: For ultra-high-humidity plants like rare orchids or tropical ferns, a cloche or terrarium is the ultimate hack. It creates a perfect, self-contained ecosystem.
Check out our full guide for more ideas, 12 Proven Ways to Increase Humidity for Houseplants, for practical tips that go beyond the basics.
The Secret Weapon: Airflow
This is the most overlooked aspect of plant care which we have observed during our experienced . Stagnant air is a death sentence. In the wild, plants live with a constant gentle breeze. We need to replicate that.
- Why it Matters: Airflow strengthens plant stems, helps evenly distribute humidity, and, most importantly, prevents fungal and bacterial diseases by keeping the surface of the leaves dry.
- How to Do It: You don’t need a wind tunnel. A simple oscillating fan placed on a low setting across the room from your plants is perfect. It should create a gentle sway in the leaves, mimicking a natural breeze.
When you get the balance right— pairing thoughtful humidity with consistent, gentle airflow—you create a microclimate where plants can breathe easy, absorb nutrients efficiently, and focus their energy on putting out lush, vigorous growth. It’s the final piece of the puzzle for truly world-class plant care.
4. Soil & Substrate: The Living Foundation
Soil isn’t just dirt—it’s your plant’s entire world. It’s where it eats, sleeps, and lives. Is it a comfortable, breathable space, or a cramped, soggy basement?
I repotted a struggling peace lily from dense, store-bought soil into a chunky, airy mix I made myself, and within two weeks it sent up a flower spike in thanks. For advanced growers, mixing your own substrate is the ultimate key to unlocking explosive growth.
The Ingredients of a Great Potting Mix
Every component has a job. Think of yourself as a chef, and these are your ingredients:
- Coco Coir: A sustainable alternative to peat moss. It holds moisture beautifully but resists compaction and has a neutral pH.
- Orchid Bark: Adds essential chunky structure for airflow, critical for oxygen-loving roots like those on Monsteras and Philodendrons.
- Perlite & Pumice: The aeration heroes. I always mix them in because they keep roots breathing. Without them, soil compacts into something closer to wet cake batter than a healthy root zone.
- Worm Castings: The secret sauce. This is more than just fertilizer; it’s a slow-release superfood packed with beneficial microbes that improve soil health.
- Horticultural Charcoal: A natural filter that helps absorb impurities and toxins, keeping the root zone fresh and healthy.
Tailoring Your Mix to Your Plant’s Needs
One mix does not fit all. The goal is to mimic a plant’s natural habitat:
- The Aroid Mix (for Monsteras, Philodendrons, Pothos): These plants are epiphytes! They need a mix that is airy and retains moisture without ever becoming soggy.
- The Succulent & Cactus Mix: The number one rule is drainage, drainage, drainage. A standard potting mix will hold too much water and cause rot.
- The Fern Mix: These plants prefer consistently moist (but not wet) soil with a finer texture to hug their delicate roots.
My Go-To Aroid Mix Recipe:
This is the recipe I use for most of my tropical plants. It’s impossible to overwater because it’s mostly air.
- 1 part Coco Coir
- 1 part Orchid Bark
- 1 part Perlite
- A handful of Worm Castings (for nutrients)
- (Optional) A sprinkle of Horticultural Charcoal
When and How to Repot
Repotting isn’t just about upsizing; it’s about renewing your plant’s entire living environment.
Signs it’s time to repot:
- Roots are circling the inside of the pot or growing out the drainage holes.
- Water runs straight through the pot without being absorbed (a sign the soil is hydrophobic).
- The plant dries out suspiciously fast.
- Growth has stalled despite good light and feeding.
Pro Tip: Always choose a pot only 1-2 inches larger in diameter. Too much space means too much wet soil, which can lead to root rot. Terracotta is best for moisture-wicking, plastic for moisture retention.
The Non-Negotiable: Sterilize Your Tools
I learned this lesson the hard way after accidentally spreading spider mites to half my collection with a dirty pair of pruners. Now, a little bottle of isopropyl alcohol sits right on my plant care shelf.
- For Tools: Wipe down blades with 70% isopropyl alcohol before and after every use.
- For Soil: If you’re reusing pots or suspect your bagged mix might have pests, you can sterilize it by baking a spread-out layer in the oven at 200°F (93°C) for 30 minutes. (Fair warning: your kitchen will smell like earth!)
5. Nutrition: Feeding for Vigorous Growth
For years, I avoided fertilizer because I thought I’d burn my plants. But eventually I realized their soil is basically a closed lunchbox—it runs out of food fast. Once I started feeding regularly, the difference was night and day.
The Plant Nutrition ABCs: Understanding NPK
The numbers on a fertilizer bottle (NPK) aren’t a mystery. They’re a simple code telling you what’s inside:
- Nitrogen (N): The leaf-maker. It’s the key driver for lush, green, vegetative growth. A deficiency shows as yellowing lower leaves.
- Phosphorus (P): The root and bloom booster. It supports strong root development, flowers, and fruits. A deficiency can cause dark or purple-tinged leaves and poor growth.
- Potassium (K): The immune system. It ensures overall vigor, regulates internal processes, and builds disease resistance. A deficiency causes brown scorching and curling on leaf tips.
And don’t forget the micronutrients (iron, magnesium, manganese, etc.)! They’re like vitamins—needed only in trace amounts, but without them, plants can’t truly thrive, often showing as yellowing between leaf veins.
How to Choose the Right Fertilizer Type
The best fertilizer depends on your style and your plant’s needs.
- Liquid Fertilizers: Give you maximum control. I use a balanced liquid fertilizer (like Purived’s 4-5-5) at half-strength with every watering during the growing season. It’s like giving your plants a gentle, consistent snack instead of a huge, overwhelming meal.
- Slow-Release Fertilizers: The “set it and forget it” option. Granules or spikes (like Burpee Organic Plant Food) release nutrients gradually over months. I like to use these as a nutritional baseline, especially in large pots that are a pain to liquid-feed.
- Organic vs. Synthetic: Organic options feed the soil ecosystem, while synthetics feed the plant directly. Both have their place. I prefer organics for long-term soil health.
The Golden Rule: Fertilize During Active Growth
Your plants’ appetites change with the seasons.
- Spring & Summer: This is dinner time! Feed regularly according to your chosen method.
- Fall & Winter: For most plants, this is nap time. Stop fertilizing entirely. Growth has slowed or halted, and added nutrients will just sit in the soil, potentially harming the roots.
Pro Tips for Advanced Feeding
- Prevent Salt Buildup: Over time, fertilizers can leave behind salty residues that “lock out” nutrients, making them unavailable to the plant. Every 3-4 months, take your plants to the sink or shower and thoroughly flush the soil with water until it runs freely from the drainage holes. This rinses away excess salts and gives the roots a fresh start.
- Foliar Feeding: For a rapid fix to a micronutrient deficiency, you can apply a very diluted liquid fertilizer directly to the leaves. Do this in the early morning or evening to prevent leaf burn.
When you feed with intention—matching the meal to the plant’s appetite and the season—you’re not just maintaining your plants, you’re fueling their growth into vibrant, resilient, and breathtaking specimens.
I highly recommend the Fertilizing Houseplants guide from university of Connecticut’, ‘s Soil Nutrient Analysis Laboratory for its detailed, science-backed advice on selecting fertilizers, understanding nutrient needs, and avoiding common issues like overfertilization.
Advanced Techniques for Houseplant Enthusiasts
1. Advanced Propagation & Transplanting Techniques
Propagation is where science meets creativity — and for experienced growers, it’s a chance to expand collections with precision.
Stem cuttings can be rooted in water, sphagnum moss, or perlite, each with its own strengths. Water rooting offers easy monitoring of root growth but can produce weaker, water-adapted roots that need careful transition to soil, see: How to Transfer Philodendron from Water to Soil the Right Way.
Sphagnum moss holds moisture while allowing airflow, reducing rot risk. Perlite provides excellent aeration and is ideal for species prone to stem rot.
Air layering is a game-changer for larger plants or woody stems. By wounding a stem, wrapping it in moist sphagnum, and enclosing it in plastic, you encourage roots to form before detaching the new plant — a low-risk method for valuable specimens.
Leaf cuttings work beautifully for succulents and peperomia, where a single healthy leaf can produce an entirely new plant. Seed propagation is for the adventurous — success depends on sterile media, consistent warmth, and patience.
To avoid transplant shock, water plants a day before repotting, handle roots gently, and keep them out of direct sun for a few days afterward.
2. Pruning & Shaping: Aesthetics & Health
Pruning isn’t just about tidiness — it’s a tool for directing growth. Removing the tip of a stem encourages branching and bushiness, while cutting back leggy growth restores proportion.
Always sterilize pruners between plants to prevent disease spread, and choose the right tool — fine snips for delicate stems, bypass pruners for thicker growth.
Understanding the hormonal response is key: pruning above a node redirects auxins, stimulating dormant buds below the cut.
For vining and climbing plants, training and staking guide growth while maintaining airflow and light exposure.
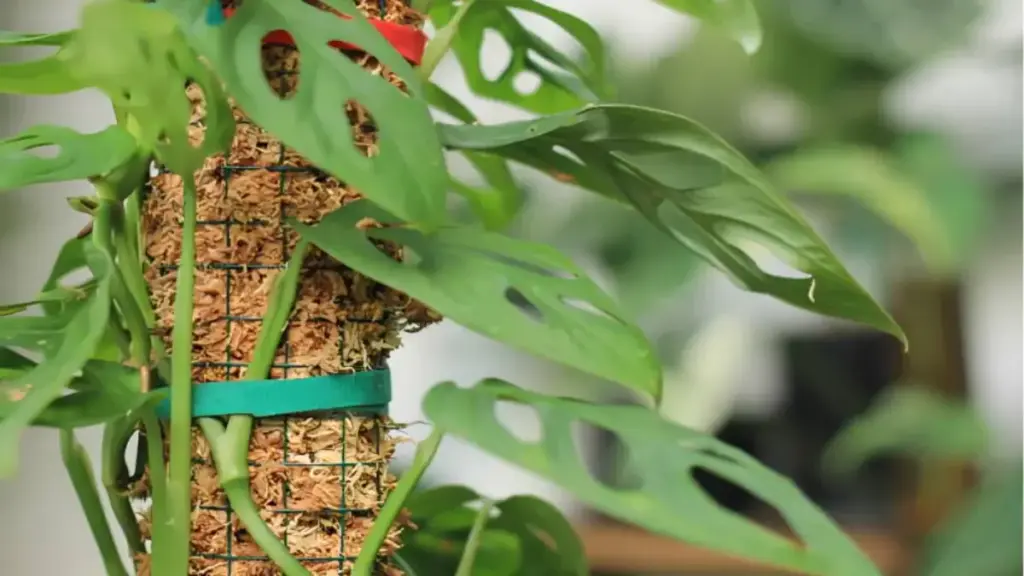
3. Supporting Climbing Plants: The Moss Pole Advantage
Moss poles mimic the natural climbing supports many tropical plants evolved with, encouraging larger leaves and stronger stems. They also give aerial roots something to grip, improving stability and nutrient uptake.
DIY poles can be made from PVC or wooden stakes wrapped in sphagnum moss or coco coir. Attach plants gently with soft ties, avoiding damage to stems. Keep the moss moist to encourage root attachment — a light misting or slow-drip system works well.
For a full setup guide, see How to Get a Plant to Grow on a Moss Pole.
4. Pest Management: Integrated & Proactive Strategies
Even the most carefully tended collections face pests. The key is early detection — inspect leaves (top and underside) weekly, and use sticky traps to monitor flying insects.
Know your enemies: mealybugs look like cottony clusters, spider mites leave fine webbing, thrips cause silvery streaks, and fungus gnats hover near soil.
Organic controls like neem oil, insecticidal soap, or rubbing alcohol are effective for light infestations. Beneficial insects, such as ladybugs or predatory mites, can help in larger setups.
Systemic solutions should be reserved for severe cases and used with caution, following all safety guidelines.
Always quarantine new plants for at least two weeks before introducing them to your main collection.
This is part of an Integrated Pest Management (IPM) approach — combining prevention, monitoring, and targeted treatment for long-term sustainability.
Diagnosing & Solving Common Houseplant Problems
1. Decoding Plant Language: Symptoms & Solutions
Plants rarely suffer in silence — they communicate through changes in leaves, stems, and growth patterns.
The key is learning to read those signals and trace them back to the real cause, not just the surface symptom.
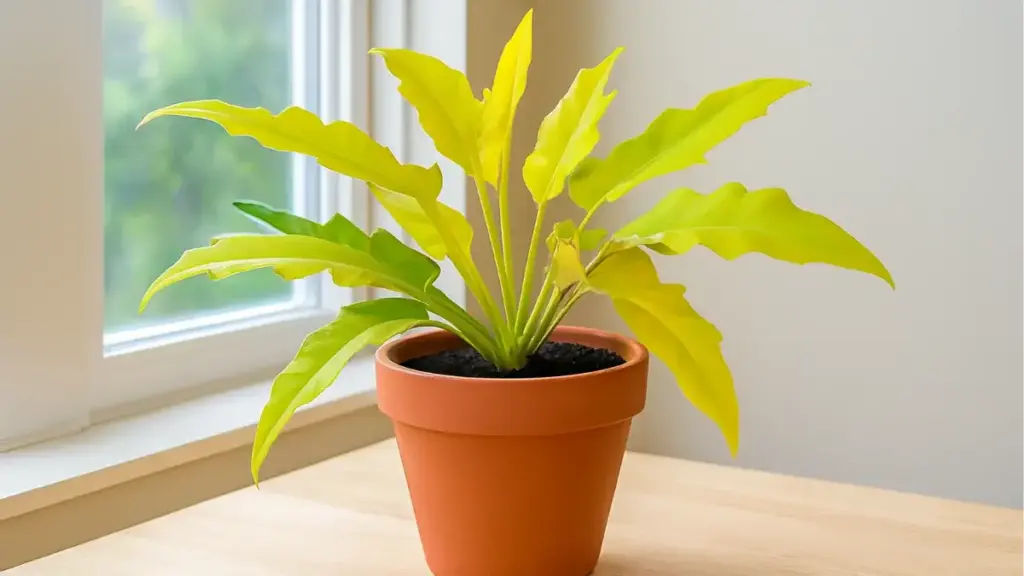
Yellowing leaves are one of the most common distress calls, but they can mean very different things. Uniform yellowing from the bottom up often points to overwatering and root suffocation. Patchy yellowing with green veins may indicate a nutrient deficiency, especially nitrogen or magnesium. If yellowing is paired with pale, weak growth, insufficient light could be the culprit.
Brown tips or edges usually signal low humidity, especially in tropical species, but can also result from mineral buildup in the soil or chronic underwatering. If the browning is crisp and starts at the tips, think humidity; if it’s irregular and accompanied by white crust on the soil, suspect excess salts.
Drooping or wilting can be deceptive — both overwatered and underwatered plants can collapse. The difference lies in the soil: soggy and heavy means roots may be rotting; dry and light means the plant is thirsty. Heat stress can also cause sudden midday drooping, which often recovers by evening.
Stunted growth is a slow-burn problem. It can stem from nutrient deficiencies, insufficient light, or a root-bound plant that’s run out of space. Pests like spider mites or thrips can also sap energy, leaving plants stuck in survival mode.
Leggy growth — long, stretched stems with wide gaps between leaves — is almost always a light issue. The plant is literally reaching for more. Lack of pruning can compound the problem by allowing energy to flow into weak, elongated stems. For succulent-specific solutions, see Rescuing Leggy, Overgrown Succulents: A Complete Guide.
Leaf drop is a plant’s way of shedding what it can’t support. Sudden changes in temperature, drafts, or light can trigger it, as can pest infestations or inconsistent watering. The key is to identify whether the drop is seasonal and natural (as with some ficus) or a stress response that needs intervention.
When you stop treating symptoms in isolation and start tracing them back to environmental, nutritional, or structural causes, you move from firefighting to true plant stewardship — and that’s when your collection begins to thrive consistently.
Houseplant Problem Diagnosis Chart
| Symptom | Common Causes | Actionable Solution | Prevention |
|---|---|---|---|
| Yellowing Leaves | Overwatering, nutrient deficiency (esp. nitrogen or magnesium), pest infestation (sap-suckers like spider mites), insufficient light | Check soil moisture before watering; adjust schedule; fertilize with balanced or targeted nutrients if deficiency confirmed; inspect for pests and treat promptly | Use a moisture meter or pot weight method; maintain consistent light; fertilize regularly during active growth; quarantine new plants to prevent pest introduction |
| Brown Leaf Tips/Edges | Low humidity, mineral/salt buildup in soil, underwatering, fluoride sensitivity (e.g., Dracaena) | Increase humidity with humidifier or grouping; flush soil with distilled water to remove salts; water consistently; switch to filtered or rainwater if fluoride is suspected | Monitor humidity with a hygrometer; flush soil every 2–3 months; match watering to plant’s needs; avoid over-fertilizing |
| Drooping/Wilting Leaves | Overwatering, underwatering, root rot, heat stress | Assess soil moisture; if soggy, check roots for rot and trim damaged roots; if dry, water thoroughly; move away from heat sources | Use well-draining soil; water only when needed; avoid placing plants near heaters or in direct midday sun |
| Stunted Growth | Insufficient light, nutrient deficiency, root-bound conditions, pest damage | Move to brighter location or add grow lights; fertilize appropriately; repot if roots are circling pot; treat pests | Rotate plants for even light; repot every 1–2 years or when root-bound; maintain balanced feeding schedule; inspect regularly for pests |
| Leggy Stem Growth | Inadequate light, lack of pruning, overcrowding | Increase light exposure (closer to window or add grow lights); prune to encourage branching; space plants for even light | Provide adequate light year-round; pinch or prune regularly; rotate plants weekly for balanced growth |
| Leaf Spots | Fungal or bacterial disease, pests, water spots from overhead watering | Improve airflow; remove affected leaves; treat with appropriate fungicide or bactericide; water at soil level or use filtered water | Avoid wetting leaves late in the day; space plants for airflow; sterilize tools; quarantine infected plants |
2. Root Health: The Hidden Foundation
Roots are the unseen engine of every houseplant. When they’re healthy, growth above the soil is vibrant and resilient. When they’re compromised, no amount of extra light or fertilizer will save the plant until the root system recovers.
Identifying Root Rot
Root rot is one of the most serious threats to indoor plants, often caused by prolonged waterlogged soil and the fungal pathogens that thrive in it.
Above-ground symptoms can be misleading — yellowing leaves, wilting despite moist soil, or sudden leaf drop — but the real diagnosis comes from inspecting the roots.
Healthy roots are firm, white to cream-colored, and smell earthy. Rotted roots are dark brown or black, mushy, and may have a sour or swampy odor2.
If you suspect root rot, act quickly:
- Gently remove the plant from its pot, supporting the root ball to avoid tearing.
- Rinse away old soil to expose the roots.
- Trim all affected roots with sterilized scissors or pruners, cutting back to healthy tissue.
- Repot into fresh, well-draining mix and a clean pot with drainage holes.
- Reduce watering until new growth appears, then resume a normal schedule.
Air Pruning Pots
For prevention and long-term root health, air pruning pots (fabric pots or containers with side slits) encourage roots to branch rather than circle the pot.
When roots reach the pot’s edge, exposure to air naturally stops their elongation, prompting the plant to produce more lateral roots — creating a denser, more efficient root system.
Mycorrhizal Fungi
These beneficial fungi form symbiotic relationships with plant roots, extending their reach and improving water and nutrient uptake.
In return, the plant supplies the fungi with carbohydrates. Adding mycorrhizal inoculants during repotting can be especially beneficial for long-term potted plants, helping them adapt to container life and resist stress.
Root inspections should always be done with care. Support the plant at the base, loosen the soil gently, and avoid pulling on stems.
Use sterilized tools — cleaned of debris and disinfected with 70% isopropyl alcohol or a 10% bleach solution — before and after cutting to prevent spreading pathogens between plants.
When you prioritize root health, you’re not just fixing problems — you’re building a foundation that supports every other aspect of plant care.
Specific Plant Care Deep Dives for the Enthusiast
1. Philodendron Care: Aroids for All Levels
Philodendrons are among the most adaptable houseplants, but thriving with them means understanding their growth habits.
Vining types (like Philodendron hederaceum) benefit from climbing supports and regular pruning to encourage fullness.
Self-heading types (like Philodendron ‘Golden Crocodile’) grow from a central stem and need space to spread, plus occasional removal of older leaves to keep them looking fresh.
They prefer bright, indirect light, evenly moist but well-draining soil, and moderate humidity. Apply a balanced fertilizer once a month while your plant is actively growing.
For a deep dive into one of the most striking varieties, see Golden Crocodile Philodendron Care (Complete Guide).
2. Succulent & Cactus Care: Mastering Drought Tolerance
Succulents and cacti store water in their leaves and stems, making them champions of drought tolerance — but they still need the right care to look their best. Use the soak and dry method: water deeply until it drains, then wait until the soil is completely dry before watering again.
Light is critical for compact growth and vibrant stress colors — aim for at least 6 hours of bright, direct light daily. To prevent etiolation (stretching), keep them as close to a sunny window as possible or supplement with strong grow lights.
Expert tip: Always use a gritty, fast-draining soil mix (e.g., cactus mix with added perlite or pumice) to prevent root rot.
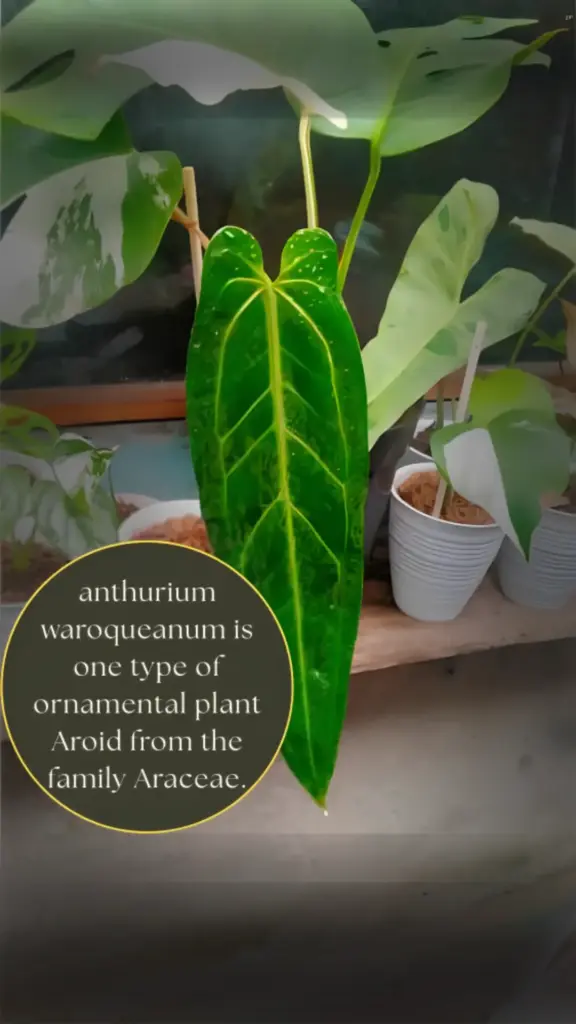
3. Caring for Rare & Unique Houseplants
Rare plants often come with very specific needs. Research their native habitat to match light, humidity, and temperature as closely as possible. When introducing a new rare plant, acclimation is key — start in a stable, moderate environment and gradually adjust to its preferred conditions.
Protect your investment by quarantining new arrivals, inspecting regularly for pests, and shielding them from sudden environmental changes. For more advanced strategies, see Rare Plants Care: Expert Tips for Thriving Unique Houseplants.
FAQ
How often should I fertilize my houseplants, and does it depend on the season?
Most houseplants benefit from regular fertilization during their active growing season (spring and summer), typically every 2-4 weeks. Reduce or stop fertilizing during fall and winter when when plant growth naturally declines. Always dilute liquid fertilizers to half strength to prevent nutrient burn.
My plant’s leaves are curling. What could be the cause?
Leaf curling can indicate several issues: underwatering (leaves may feel dry and crispy), overwatering (leaves may be soft and limp), low humidity, pest infestation (check undersides of leaves), or temperature stress (too cold or too hot). Assess the soil moisture and inspect for pests first.
Is distilled water necessary for all houseplants?
While not strictly necessary for all houseplants, distilled or filtered water is highly beneficial for sensitive plants like Marantas, Calatheas, and carnivorous plants, which are prone to fluoride and chlorine toxicity. For most common houseplants, tap water that has sat out for 24 hours (to allow chlorine to dissipate) is usually sufficient, but always observe your plant’s reaction.
How do I know if my plant is root-bound and needs repotting?
Signs of a root-bound plant include roots growing out of drainage holes, water running straight through the pot without soaking in, stunted growth despite adequate care, and a plant that dries out very quickly. Gently lift the plant from its pot to inspect the root ball; if it’s a dense mass of roots, it’s time to repot.
What’s the best way to prevent fungus gnats?
Fungus gnats thrive in consistently moist topsoil. The best prevention is to allow the top inch or two of soil to dry out completely between waterings. Other methods include using sticky traps, applying a layer of horticultural sand or fine gravel on the soil surface, or using beneficial nematodes (Steinernema feltiae) for persistent infestations.
Conclusion
Thriving houseplants aren’t about having a green thumb—it’s about building green wisdom. It’s the product of learning to listen, to observe, and to understand the incredible science happening in that pot on your windowsill.
This journey is one of lifelong learning. You’ll have victories (that first perfect new leaf) and humbling lessons (the plant you just couldn’t save). I’ve had both, and I cherish them equally.
So go pick up that one plant you’re a little worried about. Feel its weight. Look at the quality of light on its leaves. This isn’t a chore; it’s a conversation. And I promise you, your plants are ready to talk.